
How do I triangulate in IRON NEST?
Place spotter tokens, draw yellow bearing lines from each observer, mark the intersection, then red-pencil from IRON NEST to that mark for range and bearing on the clipboard.

IRON NEST how to triangulate: spotter tokens on the A–T grid, draw bearing lines, mark the intersection, red-pencil range to clipboard, then ballistics.
Spotter tokens, yellow bearing lines, intersection marks, and the red pencil range copy to clipboard.
~11 min read
Sponsored
IRON NEST how to triangulate is the map skill that turns frontline spotter reports into a grid fix you can shoot. Field reports name observer positions and bearing angles; you place tokens on the 20×10 tactical grid, draw lines, mark the intersection, then measure range from your turret to that point. This IRON NEST triangulation guide covers grid layout, pencil tools, two-spotter fixes, and the red-line step that feeds the ballistic calculator. Verified August 16, 2026.
| Fact | Detail |
|---|---|
| Grid size | 20 columns (A–T) × 10 rows (1–10) |
| Sub-cell precision | 0–9 within each cell (left→right, bottom→top) |
| Distance scale | ~1 grid unit ≈ 1 km (map protractor confirms) |
| Spotter input | Bearing in degrees from each observer token |
| Target fix | Intersection of two (or more) bearing lines |
| Range source | Red pencil from turret token to target mark |
| Next step | Powder charges on calculator |
The tactical map spans columns A through T and rows 1 through 10. Zoom into any cell and you see a 10×10 sub-grid labelled 0–9 horizontally and vertically — that is how teleprinter coordinates like A2 55 or D8 88 resolve to a precise point. One major grid step is roughly one kilometre, so a line measured at about 14 map units copies as roughly 14 km on the clipboard.
Your IRON NEST token starts on the map at the coordinate High Command lists on the teleprinter. If the default placement looks wrong, you can drag the turret icon — campaign missions expect you at the printed location, but sandbox practice sometimes leaves it misplaced until you correct it.
Targets arrive three ways: a full grid reference (no triangulation needed), a single spotter bearing (rare — usually paired), or two or more bearings you must intersect. The grid is the same in the demo and full release; only mission density changes.
| Label | Meaning |
|---|---|
| A–T | West → east columns across the battlefield |
| 1–10 | South → north rows |
| Sub-digit pair | Fine position inside one cell (e.g. 55 = column 5, row 5 of sub-grid) |
| IRON NEST token | Your firing position — origin for final range line |
| Target token | Intersection mark or supplied coordinate |
| Spotter token | Frontline observer at a known grid cell |
Grid references like Q442 mean "go to column Q, row 4, sub-cell 42" — draw a red line from the turret and skip spotter math. Bearing reports mean "from spotter one, the enemy lies on azimuth 65°" — you need geometry, not a single square name.
Campaign missions mix both: a reference point Alpha might be fixed by two spotter bearings first, then individual targets are reported as bearings from Alpha plus a second spotter line. Learn the grid once; every later mission reuses it.
Pencil tools sit along the map edge — the next section explains which colour to pick before you place a single token.
Three pencils and a compass protractor share the map table. Using the wrong colour is the fastest way to get a correct-looking drawing that never copies to your firing clipboard.
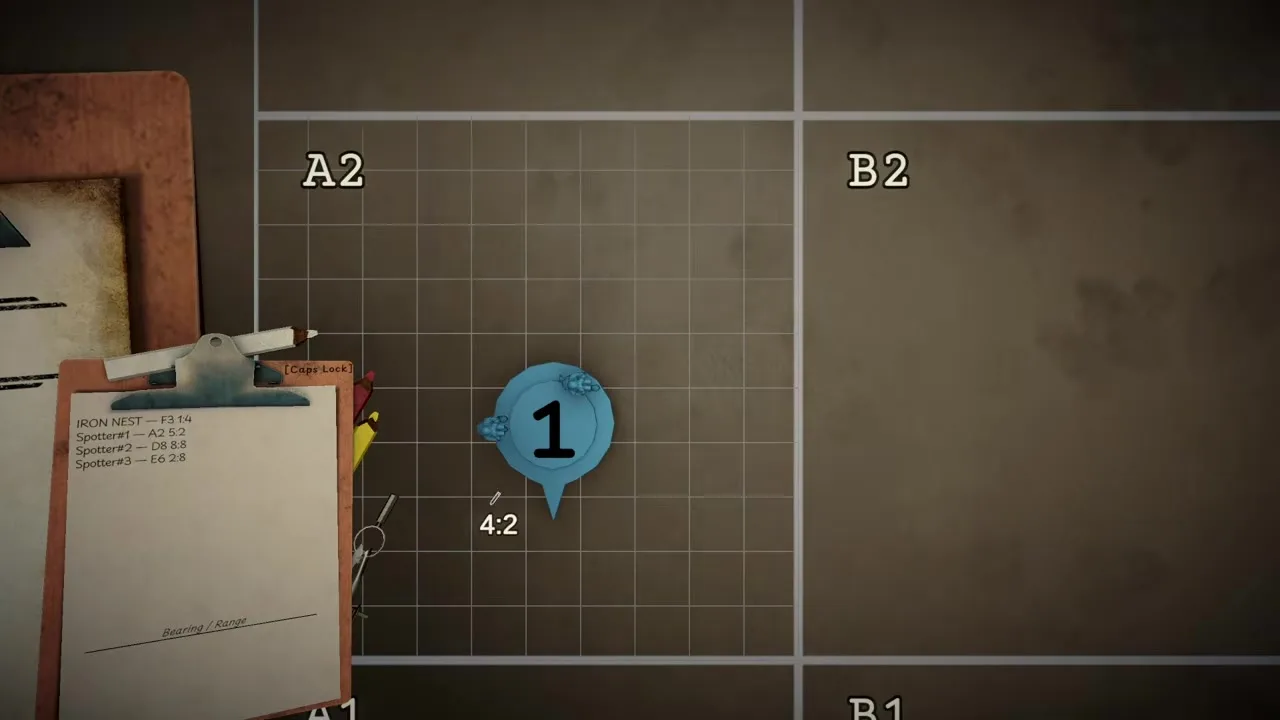
| Tool | Use | Clipboard? |
|---|---|---|
| White pencil | Freehand markup — planning lines, notes | No |
| Yellow pencil | Bearing line from a spotter or reference point; optional distance arc with protractor | No — visual only |
| Red pencil | Line from IRON NEST (or designated origin) to target mark | Yes — range (km) + bearing (°) |
| Compass protractor | Set bearing direction; stretch to a known distance from a token | No — aids yellow-line placement |
| Right-click map | Delete selected pencil lines | — |
| Right-click clipboard | Clear stored range/bearing values | — |
Draw yellow rays from each spotter along the reported bearing until they cross. That intersection is your aim point — but the ballistic calculator still needs range from the turret, not from a spotter.
Switch to the red pencil, click your IRON NEST token, drag to the intersection (or supplied grid target), and release. The clipboard panel below the map fills with range in kilometres and bearing in degrees for traverse and ballistics.
The yellow pencil can also show distance when you use the protractor from a spotter — helpful for bearing-plus-distance missions covered below.
Field reports and teleprinter lines name each observer by callsign and grid square. Before drawing bearings, drag a spotter token onto that cell and verify sub-coordinates when the report includes them (e.g. spotter one at A2 55, spotter two at D8 88, spotter three at E6 28).
Missions label observers "Spotter One," "Spotter Alpha," or numbered field assets — the label is flavour. What matters is the grid cell and the bearing in degrees attached to that callsign.
If a report says "spotter one, bearing 90°" but omits a position, scroll the teleprinter — observer coordinates usually appear earlier in the same message block. Placing a spotter at the wrong cell rotates every line you draw.
Multi-target missions reuse the same spotters for several intersections. Keep tokens on the board until all targets for that fire order are marked — then measure each from the turret separately.
With tokens placed, you are ready to draw the crossing lines — the core iron nest bearing skill.
The standard iron nest how to triangulate flow uses two frontline observers sighting the same enemy from different positions. Each bearing is a compass angle from north; where the yellow lines meet is the target cell.

| Step | Action |
|---|---|
| 1 | Place spotter tokens at reported grid cells |
| 2 | Select yellow pencil → click spotter one → drag along bearing one to map edge |
| 3 | Repeat from spotter two with bearing two |
| 4 | Drop a target token at the intersection (centre of the X) |
| 5 | Delete yellow lines if cluttered; keep the target token |
| 6 | Red pencil: IRON NEST → target token → read clipboard range + bearing |
| 7 | Enter range on calculator; pick powder charges for that distance |
Numbers below are a teaching sketch, not a copied mission brief. Suppose spotter one reports a bearing (example 65°) and spotter two reports a distance from their post (example ~14 km). Sweep the yellow line from spotter one along that bearing; from spotter two, arc the protractor to the reported distance and mark the cross. That staging mark — missions sometimes label it a reference point such as Alpha — is often an intermediate fix, not always the final shell target.
Later orders may say "target one: bearing from Alpha" plus "bearing from spotter three." Repeat the same intersection logic using the reference point as the origin for the first ray. Always double-check degrees — a few degrees of error at long range misses by more than a kilometre.
When two bearings are shallow and the intersection sits near the map edge, a third spotter report breaks the tie. Draw all three yellow rays; the target token goes where the cluster converges, not at an arbitrary edge click.
If lines genuinely parallel (bad intel), re-read field reports — one bearing may be a typo in the tens digit (115° vs 115° mirrored). No amount of calculator work fixes a map fix that never existed.
Intersection locked, range copied — powder charge count is the next decision on the ballistics page.
Matched by build plan, shared topics, and guide progression — not random related links.
Some orders pair bearing from spotter A with range from spotter B rather than two bearings. The yellow pencil handles bearing; the compass protractor anchored on spotter B sets the distance arc. The point where the ray and arc meet is your fix — same token-and-intersection workflow, different inputs.
| Report type | Map action |
|---|---|
| Bearing + bearing | Two yellow lines from two spotters |
| Bearing + distance | Yellow bearing from A; protractor distance from B |
| Grid + grid | No triangulation — red line turret to named cell |
| Bearing from reference point | Yellow from Alpha (or marked RP), not from turret |
| Distance from turret only | Red pencil measure — calibration missions |
Some story / demo missions introduce a reference point (often labelled Alpha in community write-ups) fixed by spotter bearing plus another spotter's distance, then list later targets relative to that mark. Work top to bottom — solve the staging mark before dependent target lines.
Mark each solved target with its own token colour or label if the UI allows; at minimum, move the previous target token aside so you do not confuse target two with target one when measuring range from IRON NEST.
Each target still needs its own red-line range to the turret — spotter distance is not firing range unless you are explicitly ordered to fire from a spotter (you are not).
Triangulation ends when the clipboard shows range and bearing from the red pencil measurement. Bearing drives turret traverse; range drives powder charge selection and elevation on the mechanical calculator — two different wheels, two different numbers.
Public mission examples cluster near 8–14 km with two to three powder charges. Qualitative bands used across community guides: under ~5 km often one charge; ~5–10 km two charges; ~10–15 km three; longer spreads need four or more. The calculator always overrides guesswork once range is typed.
A demo calibration near 8.92 km typically uses two charges and an elevation near 33° — exact decimals come from the in-game instrument, not from memorising tables. See the dedicated ballistics page for charge mismatch pitfalls.
Impact reports and new field traffic may shift the aim point — redraw yellow lines, move the target token, and re-run the red pencil. Range changes of even half a kilometre can change charge band and elevation.
Counter-battery and timed missions punish slow map work; build the habit of clearing old lines and clipboard entries before each new fix. Speed comes from repeating the same token → yellow → intersect → red sequence, not from skipping verification.
Shell choice still depends on target class — after range is set, check shell types if the teleprinter authorizes more than one round.
Most missed salvos trace to map process, not loading or traverse skill. Use this table before you crank the calculator.
| Mistake | Fix |
|---|---|
| Spotter placed on wrong sub-cell | Match both letter-number and sub-digits from the report |
| Used red pencil for spotter bearings | Yellow for observer rays; red only turret → target |
| Bearing mirrored (65° vs 295°) | Confirm direction from spotter token, not from map edge habit |
| Measured range spotter-to-target | Final range is always IRON NEST → target token |
| Skipped staging / reference point | Solve intermediate marks before dependent target lines |
| Stale clipboard from prior target | Right-click clipboard panel to clear |
| Trusted default IRON NEST position | Move token to teleprinter coordinate first |
| Forgot charge band after range change | Re-open ballistics when range shifts |
Before leaving the map table, read the spotter report aloud against your drawing: callsign → cell → bearing for each line. Then read clipboard range against a rough map estimate (14 km should not appear for a target visually next to your turret). Ten seconds there saves one wasted shell and a mission timer penalty.
If triangulation feels slow, drill in the demo Fire-and-Light missions or Chill sandbox — same grid, no counter-battery clock. The beginner guide covers the full loop if you need teleprinter context first.
Place spotter tokens, draw yellow bearing lines from each observer, mark the intersection, then red-pencil from IRON NEST to that mark for range and bearing on the clipboard.
A compass angle in degrees from a spotter or reference point to a target. It defines direction only — you still need range from the turret for ballistics.
Place the spotter token on the teleprinter grid, draw the yellow bearing line toward the target, then copy the degree reading onto your clipboard before measuring range from the Nest. Patch 1.0 (1577) also fixed off-centre Blindfire spotters — see updates.
Check the teleprinter block for that mission — coordinates vary. Place the token on the named grid cell before drawing bearings.
No. Draw a red line from the turret to the target coordinate and read range directly.
Treat one major cell step as roughly one kilometre. The protractor tool confirms measured distances on yellow lines.
Ballistics for powder charges and elevation, then shell selection per teleprinter authorization.
Yes — the demo guide Chill sandbox repeats map tools without counter-battery timers.
August 16, 2026
Matched by build plan, shared topics, and guide progression — not random related links.