
Is IRON NEST hard to learn?
The loop is systematic — map reading and ballistics, not reflexes. Expect 30–60 minutes in the demo or first campaign missions before the sequence feels natural.

IRON NEST beginner guide: teleprinter intel, map bearings, ballistic calculator, loading, traverse, and first HE fire mission — step-by-step for Operators.
Full fire-control walkthrough — quarters, teleprinter, map, calculator, loading, and first shots.
~9 min read
Sponsored
IRON NEST: Heavy Turret Simulator is a first-person dieselpunk heavy-artillery sim from Nick Nieuwoudt, Dominik Latos, published by Nick Nieuwoudt, Dominik Latos, released on Steam August 6, 2026. This IRON NEST beginner guide teaches the full fire-control loop you repeat every mission: read teleprinter orders, work the tactical map, run the ballistic calculator, load shells and powder charges, traverse the 5,000-ton turret, and fire. Verified August 16, 2026 · Steam.
| Fact | Detail |
|---|---|
| Platform | PC (Steam · GOG · Epic) |
| Genre | Simulation · Action · Indie · Dieselpunk · Heavy Artillery |
| Mode | Single-player (co-op planned post-launch) |
| Price | $19.99 base · launch discount available |
| Release | Released August 6, 2026 |
| Demo | Free Steam demo available |
| Shells unlocked | 30 unlockable ammo types & abilities (Steam) |
| Campaign scope | 15 campaign regions |
| Reviews | Overwhelmingly Positive on Steam |
Every mission starts with paper, not the map. High Command sends orders through the teleprinter on your desk; field reports arrive on a second machine. Treat both as mandatory reading — target type, grid references, and special constraints (star shell only, no collateral, counter-battery window) all live in those lines.
The High Command teleprinter carries TOP-PRIORITY directives: what to destroy, which ammunition is authorized, and sometimes propaganda-facing language that still hides a grid square. Field reports relay frontline radio traffic — spotter bearings, damage assessments, and urgent corrections.
New Operators skim one and miss the other. A starburst mission that says "STAR shell only" on the teleprinter will fail if you load HE because the field report looked more urgent.
Below deck you have your bed, ration station, mission selector, and challenge scoreboards. Up the ladder is the working turret: map table, ballistic calculator, loading station, traverse wheels, and the viewports over both barrels.
Learn that split early. Coffee and mission picks happen downstairs; every shot happens upstairs. The free demo guide runs the same layout if you want a shorter mission set first.
Once the orders make sense, the next bottleneck is almost always map work — not gunnery.
The tactical map is a 20×10 grid (columns A–T, rows 1–10) where one unit equals roughly one kilometre. Your IRON NEST token sits at a known coordinate; targets arrive as grid references or spotter bearings you must intersect.
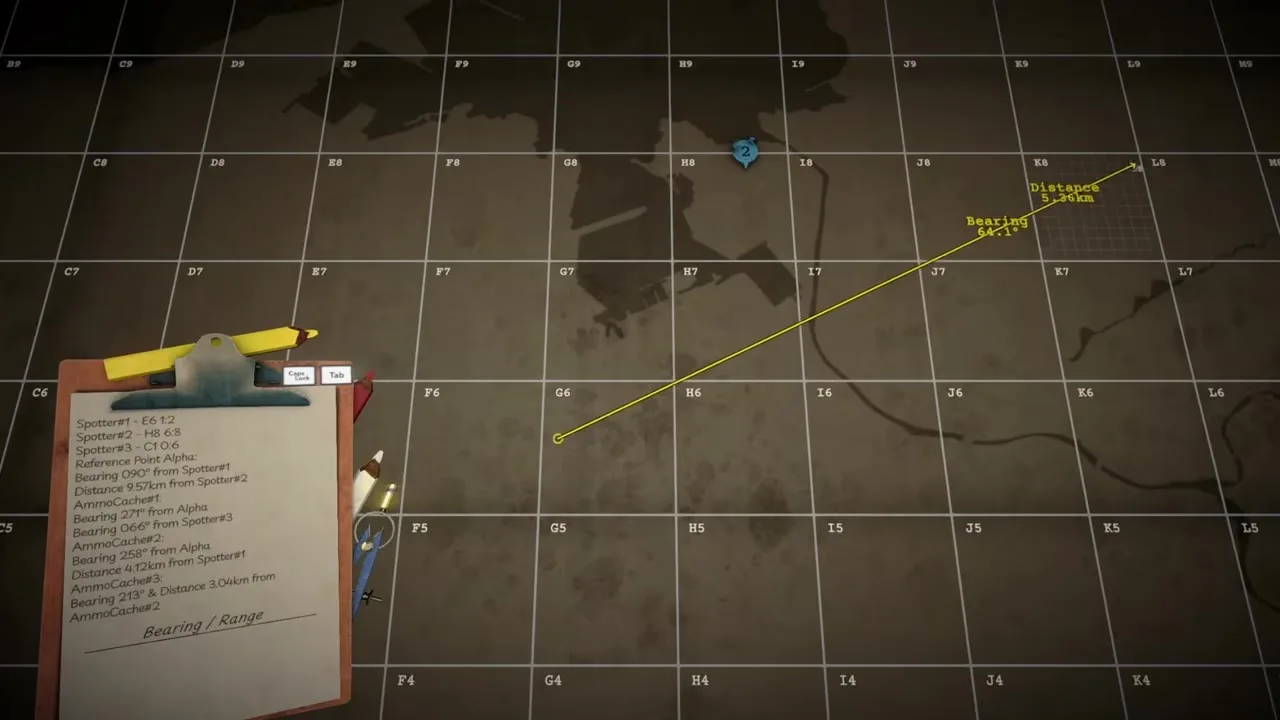
| Tool | Use |
|---|---|
| Yellow pencil | Spotter bearing lines and measure-only arcs — does not copy to clipboard |
| Red pencil | Line from IRON NEST turret to target mark — copies range + bearing to clipboard |
| Spotter tokens | Place at reported observer positions before drawing bearings |
| Target marker | Intersection of two bearings, or a supplied grid coordinate |
| Clipboard panel | Auto-fills range (km) and bearing (degrees) from red lines |
Calibration missions and simple strikes give you two grid squares: IRON NEST at H355 and target at Q442, for example. Select the red pencil, click your turret token, drag to the target cell, and read range (~8.9 km) plus bearing on the clipboard.
You do not need triangulation when High Command names both points. You still must draw the line — the clipboard only updates from map measurements, not from the teleprinter text.
Later missions give bearings from two observers: "Spotter One, bearing 90°" and "Spotter Alpha, bearing 271°." Place tokens, draw yellow bearing lines from each spotter, mark the intersection, then a red line from your turret token to that mark for clipboard range.
Full step-by-step with common mission layouts lives on triangulation. For your first hours, remember: two lines, one intersection, then measure range from the turret to that mark.
Range and bearing in hand, the calculator becomes the next stop — not the loading lever.
The ballistic calculator is a physical panel in the turret room. Enter range in kilometres, select powder charge count, and crank for elevation in degrees. The charge count you choose here must match the charges you load later — the clipboard elevation is valid only for that pairing.
| Range (km) | Typical charges | Notes |
|---|---|---|
| 0 – 5 | 1 charge | Short lobs — watch blast radius near friendlies |
| 5 – 10 | 2 charges | Common tutorial and demo distances |
| 10 – 15 | 3 charges | Mid-campaign spreads |
| 15 – 20 | 4 charges | Long-range arcing fire |
| 20+ | 5–6 charges | Maximum reach — elevation drops as charges rise |
Type the clipboard range (e.g. 8.92 km). Select powder charge count before hitting calculate — the demo calibration target at ~9 km uses two charges. The machine outputs elevation (e.g. 32.7°) and copies values to your firing card.
More charges mean lower elevation for the same range because the shell exits faster. Using six charges with an elevation computed for two sends the round long — a common first-mission failure.
Players often confuse bearing with elevation. Bearing (85°, 271°, etc.) is turret rotation on the horizontal plane. Elevation is how high the barrel climbs. Calculator output is elevation only; bearing came from the map line.
Detailed charge tables and edge cases are on ballistics. Next: translate numbers into hands-on loading and gunlaying.
Matched by build plan, shared topics, and guide progression — not random related links.
Loading is manual: pick shell type on the rack, ram the round, dispense equal powder charges, ram propellant, then lock the breech. Only after loading will hydraulic elevation match your last calculated angle. Traverse uses a large lever for coarse movement and a small wheel for fine bearing alignment.

| Step | Action |
|---|---|
| 1. Select shell | Choose authorized type (HE, STAR, AP…) from ready rack or requisition |
| 2. Ram shell | Drive the round home with the rammer lever |
| 3. Powder charges | Dispense the same count used in the calculator; split evenly between chambers |
| 4. Ram charges | Seat propellant before breech close |
| 5. Traverse | Coarse lever to bearing, fine wheel to match clipboard degrees |
| 6. Elevate | Elevation wheel until barrel angle matches calculator output |
| 7. Fire | Pull firing lever on the loaded barrel; watch impact report or aerial photo |
The turret locks elevation while unloaded. Sequence is always load → traverse → fine elevation → fire. Skipping straight to the wheels without a shell loaded wastes time and breaks the hydraulic sync.
Quick-slot racks hold six ready rounds; deeper magazines pull from external supply. Early missions only issue a handful of types — HE and STAR appear before AP and chemical rounds unlock.
The large traverse lever swings the entire 5,000-ton structure; the small wheel dials in the exact bearing on your clipboard. Elevation uses a similar split: get close, then fine-adjust to the decimal the calculator gave you.
After impact, High Command or field reports tell you short/long and left/right. Adjust range input or bearing line on the map, recalculate if range shifted, and repeat. First-shot perfection is rare; predictable correction is the skill.
Shell choice changes damage more than aim tweaks on some targets — which is why the next section covers ammo before you leave the tutorial arc.
Early missions authorize HE (high explosive) or STAR (illumination) before AP and specialty rounds appear. Match shell to target class: soft troops and open emplacements take HE; night observation and starburst orders require STAR; bunkers, artillery, and hardened fire direction centers want AP.
| Shell | Best first use | Avoid when |
|---|---|---|
| HE | Infantry, soft structures, general calibration | Order specifies STAR only |
| STAR | Illumination missions, spotting at night | You need damage — STAR is light, not blast |
| HCHE | Clustered soft targets (later unlock) | Single hardened bunkers — use AP |
| AP | Bunkers, enemy artillery, FDC nodes | Wide infantry spreads — HE is cheaper |
| SMK / PGAS | Smoke screen or chemical orders (late) | Any mission without explicit authorization |
Calibration firing tests ask for HE at a grid target. Anti-infantry strikes in the campaign continuation use HE or HCHE depending on density. Until the teleprinter names another type, HE is the correct load.
Fire-and-Light style demo missions include a royal palace starburst: load STAR, arc to the grid, and adjust until High Command confirms satisfactory burst. Loading HE here fails the objective even on a perfect grid hit.
Full radius and cost numbers live on shell types and targets. Internalize the loop first; optimize matchup tables second.
Use this as a pre-fire checklist. Most failed beginner missions trace back to process — wrong charge count, skipped teleprinter line, or bearing confused with elevation — not bad reflexes.
| Mistake | Fix |
|---|---|
| Opening the map before reading orders | Read teleprinter + field reports; note shell restrictions |
| Using yellow pencil for clipboard data | Red pencil from turret or spotter — yellow is measure-only |
| Charge count mismatch | Calculator charges must equal loaded charges before firing |
| Confusing bearing with elevation | Map → bearing on traverse; calculator → elevation on barrel |
| Firing unloaded | Load shell and charges first — elevation locks until then |
| STAR mission loaded with HE | Re-read authorization line on the teleprinter |
| Ignoring blast radius on friendlies | Check map overlays before confirming fire |
| Skipping demo practice | Free demo repeats the loop without campaign pressure |
Before you touch the firing lever, read the clipboard card back against the teleprinter: correct shell type, charge count matches calculator, bearing and elevation within a half-degree of target. Ten seconds there prevents most wasted shots.
When the loop feels automatic, move to triangulation for two-spotter missions — that is where campaign difficulty actually starts.
The loop is systematic — map reading and ballistics, not reflexes. Expect 30–60 minutes in the demo or first campaign missions before the sequence feels natural.
Either works. The free demo guide covers calibration and Fire-and-Light missions; the full game adds regions, requisition, and counter-battery timers.
Interact with the map table in the turret section. Pencil tools sit along the edge; your clipboard panel updates when red bearing lines are drawn.
Match range to charge bands on the ballistics page. Near 9 km use two charges unless the calculator panel suggests otherwise after you enter exact range.
Keybinds and lever layout are on controls. Gunlaying is mostly physical levers, not FPS aiming.
Single-player (co-op planned post-launch). Co-op is planned post-launch per developer notes.
Triangulation then ballistics, then shell types.
August 16, 2026
Matched by build plan, shared topics, and guide progression — not random related links.