
What are the default IRON NEST keybinds?
Left-click copies teleprinter lines; Caps Lock toggles clipboard; Tab maximizes clipboard; right-click deletes clipboard rows. Gunlay is levers and wheels — not WASD aiming.

IRON NEST controls: Caps Lock clipboard, teleprinter copy, red/yellow pencils, calculator levers, loaders, traverse, elevation wheels, and fire triggers.
Official-style deck tour — teleprinter clipboard, map pencils, calculator levers, loaders, traverse, elevation wheels, and firing triggers.
~9 min read
Sponsored
IRON NEST: Heavy Turret Simulator controls split into keyboard shortcuts (clipboard, teleprinter copy) and physical levers (map pencils, calculator, loaders, traverse, elevation, triggers). This iron nest controls reference maps every interface on the gun deck so you know which input opens a window, copies a bearing, or moves five thousand tons of turret. Verified August 16, 2026 · Steam.
| Fact | Detail |
|---|---|
| Input mix | Mouse + keyboard for UI; levers/wheels for gunlay |
| Clipboard toggle | Caps Lock show/hide · Tab maximize |
| Map copy tool | Red pencil — bearing + range to clipboard |
| Measure-only tool | Yellow pencil — no clipboard copy |
| Gunlay | Fast traverse lever + fine bearing wheel; dual elevation wheels |
| Platform | PC (Steam · GOG · Epic) |
| Deck Verified | Steam Deck Verified · Overwhelmingly Positive |
Mission intel starts at two teletype machines: High Command orders and field reports. Iron nest keybinds here are simple — left-click any line on either printer to copy it to your clipboard. The clipboard is the floating panel that holds grid references, bearings, and notes while you work the map.
| Action | Input |
|---|---|
| Copy teleprinter / field report line | Left-click the line |
| Show or hide clipboard | Caps Lock |
| Maximize clipboard (read long orders) | Hold Tab |
| Remove a clipboard row | Right-click the row |
| Open tactical map | Interact with map table (see deck layout below) |
High Command carries shell restrictions and primary grids; field reports carry spotter bearings and counter-battery warnings. Both feed the same clipboard — color or source does not matter for copy behavior.
New Operators open the map before Caps Lock. Flip the clipboard visible first, then read both printers so grid squares and "STAR only" lines stay in view while you draw.
Right-click stale bearings after a counter-battery move or emergency reposition. Old range lines that no longer match the turret token will send the calculator the wrong kilometres if you forget to delete them.
With copy behavior set, the map pencils are the next control layer — and the red/yellow split trips more missions than any lever.
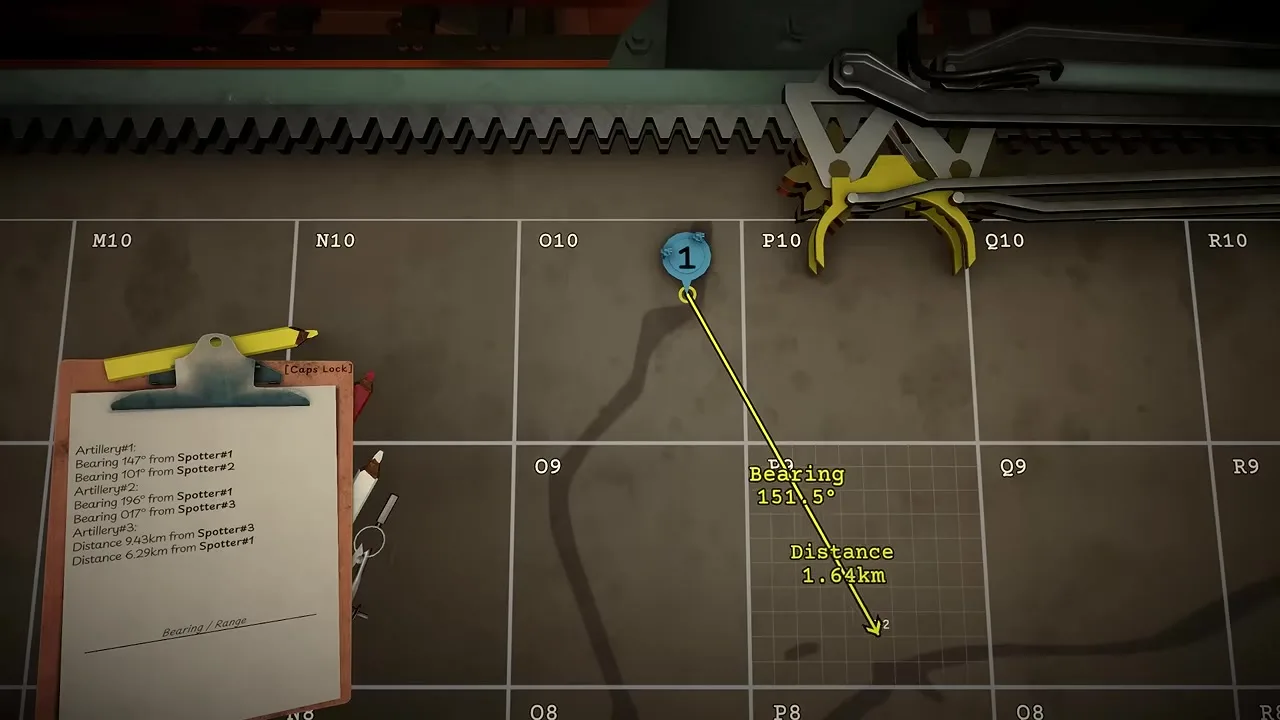
The tactical map is a 20×10 grid (columns A–T, rows 1–10). Clipboard tools sit along the map edge: a compass (range circles), white marker (freehand emphasis), yellow pencil (measure bearing/range without clipboard copy), and red pencil (measure with clipboard copy for firing solutions).
| Tool / switch | Control effect |
|---|---|
| Compass | Draw range circle from a point |
| White marker | Freehand lines — no clipboard data |
| Yellow pencil | Bearing + range measure only |
| Red pencil | Bearing + range copied to clipboard |
| Spotter tokens | Up to 4 spotters — drag from left rack |
| Reference tokens | Up to 4 reference points |
| Target tokens | Up to 8 target marks |
| Reset kill tokens | Moves kill markers to top-left |
| Delete all map measurements | Clears drawn lines |
| Reset all tokens | Returns placed tokens to left rack |
| Blast radius iris | Right side — preview round effect by shell type |
| Map legend key | Bottom-right — icon reference |
Teleprinter orders name your turret grid cell. Drag the IRON NEST piece to that coordinate before drawing red lines — calculator range is measured from the token, not from the teleprinter text alone.
Triangulation missions add spotter tokens, draw yellow lines spotter→target for distance checks, then red lines turret→intersection for clipboard range. Full walkthrough on triangulation.
The right-side iris dial selects shell type and shows blast footprint on the grid — critical when friendlies sit near the aim point. HE and HCHE do not discriminate; the map key explains infantry vs hardened icons.
Map controls mastered, the ballistic calculator panel is the next physical interface — inputs are levers, not keyboard typing.
The ballistic calculator sits left of the map table. Upper controls fill the fire mission card (bearing, target description, authorized shell). Lower controls, left to right: range input, powder charge selector, and the compute lever that prints the card and displays elevation.
| Control | Function |
|---|---|
| Range dial / input | Distance in km from clipboard red line |
| Powder charge lights | Green = viable bands; first green = minimum charges for range |
| Compute lever | Prints fire mission card + shows gun elevation |
| Fire mission card | Green check / red X markers for completed steps (optional clicks) |
| Card output | Elevation degrees — must match loaded charge count |
After range entry, charge indicators light red or green. The first green number is the minimum powder bags required to reach that distance. More charges lower elevation and shorten time-of-flight — but only if you load the same count at the breech.
Mismatch between calculator charges and loaded bags is the dominant "overshoot" bug in early missions. Charge bands by distance live on ballistics.
Printed cards show bearing, shell type, elevation, and optional green-check clicks for turret rotation, elevation set, and ordnance confirmed. Under counter-battery pressure you may skip clicks — but never skip verifying numbers on the main console.
Calculator output in hand, walk to the loader stations — elevation wheels stay locked until a shell is seated.
Each barrel has an identical loading station on the left and right of the deck. Controls run left to right: shell selector lever (rotate magazine one round), shell rammer (seats round — irreversible except by firing), charge counter (calculator bags vs loaded bags), six powder dispensers (one bag each), and charge rammer (seats propellant and closes breech).
| Lever / gauge | Action |
|---|---|
| Shell selector | Cycle ready rack by one shell type |
| Shell rammer | Drive round into barrel — cannot unload |
| Charge counter | Shows required vs loaded powder bags |
| Powder dispensers (×6) | One lever per bag — cannot return unused bags |
| Charge rammer | Seat propellant; closes breech; unlocks elevation |
| Magazine gauge (above loaders) | Remaining powder bags per gun |
Once the shell rammer fires, the only unload is shooting the round. Dispensed powder cannot return to the magazine — plan charge count before pulling dispensers.
The charge counter reads the most recent calculator solution, not a queue of future missions. Recalculate before loading if the teleprinter updated range.
Quick magazines hold six ready rounds; deeper stocks come from the requisition console on the right deck. Selector lever only cycles what is already in the ready rack.
Authorized shell types (HE, STAR, AP, HCHE…) are on shell types. Loader done — gunlay wheels and traverse levers come next.
Iron nest controls for gunlay are almost entirely physical. Elevation: twin wheels left of the trigger console — locked during loading, free once breech closes; numeric and graphic readouts on center display. Bearing: fast traverse lever (left/right, return to center to stop) plus fine adjustment wheel for exact clipboard degrees.
| Mechanism | Location / use |
|---|---|
| Fast traverse lever | Right of deck — swing turret coarse left/right |
| Fine bearing wheel | Dial exact degrees from clipboard / map |
| Elevation wheels (×2) | Left of trigger — match calculator angle per gun |
| Arming levers (×2) | Ceiling pulls — left gun / right gun |
| Main trigger | Center ceiling lever — fire armed barrel(s) |
| Main console | Elevation, time-of-flight, shell type, armed state, rotation |
| Confirmation switches | Optional pre-fire checklist — skip under timer pressure |
| Trigger raise lever | Next to bearing mechanism — lifts firing position |
Reverse the fast lever to stop — flipping direction does not brake faster. Skilled Operators start coarse swing early while finishing calculator work on the opposite side of the deck.
5,000-ton rotation has inertia; fine wheel work happens after coarse gets within a few degrees.
Below the main console, toggles mark ordnance, bearing, elevation, and armed state. Helpful for learning; optional when counter-battery timers demand speed.
First shot starts impact stopwatch — map shows fall of shot for corrections. Steam valve leaks mid-mission are covered in the FAQ; deck-access levers are next if you need quarters or engine room.
Matched by build plan, shared topics, and guide progression — not random related links.
Not every iron nest control is about firing. Yellow-lit levers behind and in front of the map open the engine room (under the map) and crew quarters (below main deck). Downstairs: mission select, bed, coffee, newspapers, challenge boards. Upstairs: every interface in this guide.
| Area | Access / controls |
|---|---|
| Engine room | Yellow lever — gauges; do not shut main engine mid-mission |
| Crew quarters | Yellow ladder lever — mission picker, rest, meta progression |
| Requisition bench | Right deck behind right cannon — credits, planes, emergency move |
| Teleprinters | Aft of map — High Command + field reports |
| Receiver desk | Mission objectives and newspapers |
The beginner guide tour walks quarters → ladder → map once. After that, treat Caps Lock clipboard as your "am I upstairs?" check — clipboard only matters on the gun deck.
Engine-room steam valves may open during operations; rotate clockwise to close if visibility loss is unacceptable (valve detail in FAQ).
Most failed salvos are wrong control sequence, not bad aim. Scan this before your first live counter-battery shot.
| Mistake | Fix |
|---|---|
| Yellow pencil for firing solution | Use red pencil turret→target for clipboard range |
| Clipboard hidden during teleprinter read | Caps Lock on before left-clicking orders |
| Computing before moving turret token | Place IRON NEST on teleprinter grid first |
| Elevation wheels while breech open | Finish charge rammer — then elevate |
| Charge count ≠ calculator | Re-read green lights before compute lever |
| Shell rammer before confirming type | Selector lever first — rammer is irreversible |
| Fast traverse left centered while loading | Stop lever in center before fine wheel work |
| Ignoring blast iris with friendlies near | Dial shell type on map radius tool |
Main console glance: correct shell icon, bearing within ~0.5°, elevation matches card, armed lever up. Ten seconds beats recomputing after a friendly-fire report.
Controls learned — triangulation is the usual next skill for two-spotter missions.
Left-click copies teleprinter lines; Caps Lock toggles clipboard; Tab maximizes clipboard; right-click deletes clipboard rows. Gunlay is levers and wheels — not WASD aiming.
Interact with the map table on the turret deck (center of the gun floor). Pencils and tokens sit on the table edge.
Check in-game Settings for keyboard rebinding. Physical levers and wheels are fixed layout on the deck.
Elevation locks until the breech closes after loading. Complete shell + charge rammer first.
Yellow measures only. Red copies bearing and range to clipboard for the ballistic calculator.
Full game is Steam Deck Verified; fine elevation wheels are easier with mouse input on PC.
Beginner guide for the full loop, then triangulation and ballistics.
August 16, 2026
Matched by build plan, shared topics, and guide progression — not random related links.